A floor plan can feel surprisingly difficult to read when you are not used to looking at one. Designers and builders spend years learning this visual language, and it is easy for us to forget that the lines, symbols, arcs, dimensions and abbreviations are not automatically obvious to everyone.
I once had someone ask me what the heavy dark lines on a floor plan meant. They were the walls. That was a good reminder that reading drawings is a learned skill. You do not need to decipher every symbol at once. Start with the big picture, then work your way into the details.
What Is a Floor Plan?
Imagine making a horizontal cut through the house, usually somewhere around four feet above the floor, removing everything above that cut, and looking straight down. That is the basic idea behind a floor plan. The exact cut plane can vary depending on what the drawing needs to communicate.
Heavy linework generally represents elements being cut through, especially walls. Doors, windows, cabinetry, plumbing fixtures, stairs, fireplaces, built-ins and other features are represented with their own drawing conventions. Elements above the cut plane may sometimes appear dashed or lighter.
A floor plan is primarily about horizontal relationships: where spaces are, how large they are and how they connect. Elevations and sections help explain heights and vertical relationships. Three-dimensional views help you experience those same decisions more like you would see them in real life.
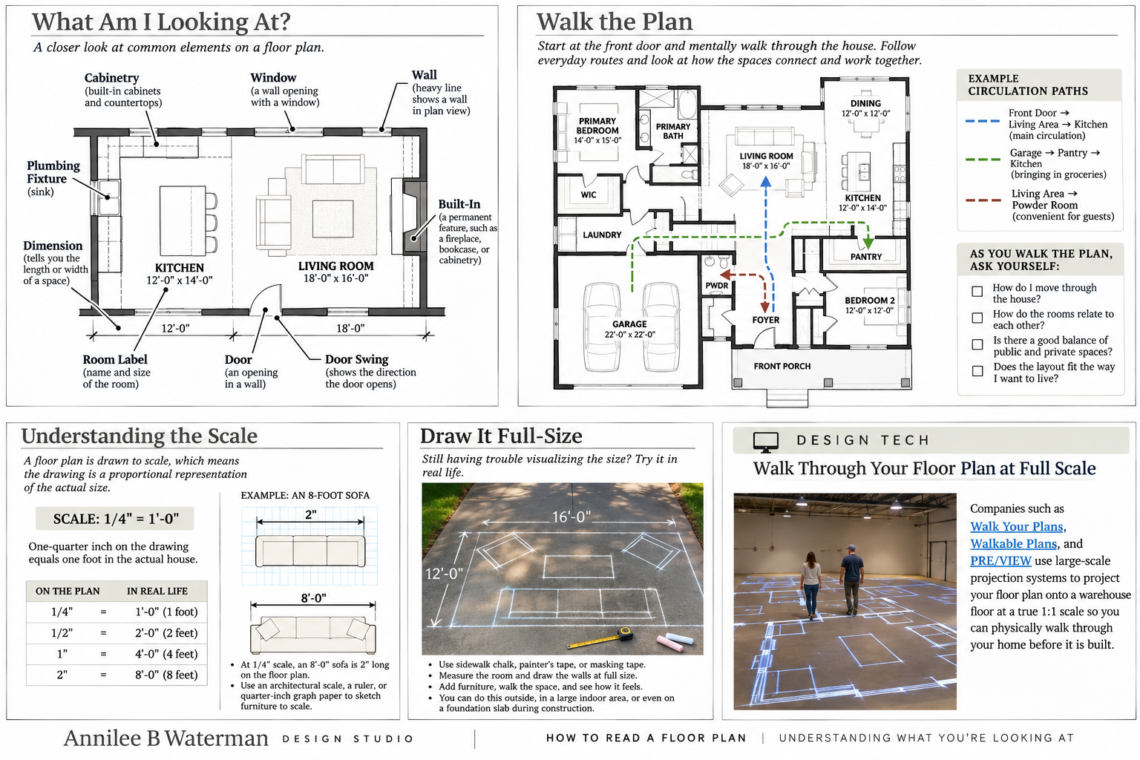
[IMAGE: What Am I Looking At? annotated floor-plan graphic]
First Pass: Find the Front Door and Walk Through the House
When practical, residential floor plans are often arranged with the front of the house toward the bottom of the sheet. That does not necessarily mean south or correspond to geographic north. Look for the front porch and front door first.
Now imagine yourself standing on the porch. Open the front door. Where do you arrive? Is there a foyer? Do you enter directly into the living room? What can you see from the doorway?
Use your finger to trace everyday routes through the house. Walk from the front door to the kitchen. Walk from the garage to the pantry while imagining carrying groceries. Walk from the primary bedroom to the kitchen in the morning. Imagine a guest looking for the powder room.
[IMAGE: Walk the Plan circulation graphic]
Second Pass: Look at Relationships Between Rooms
Once you understand the basic circulation, look at how the rooms relate to one another. Where are the public spaces compared with the private spaces? Can you see into a bedroom from the living room? Is a toilet visible from the dining area? Is the powder room convenient for guests without putting them into a private part of the house? How far is the laundry from the bedrooms?
This is where a floor plan begins to tell you about convenience, privacy, sightlines and how the house may actually function from day to day.
Third Pass: Look at How You Will Actually Live in Each Room
Now move through the plan room by room. In the living room, where does the sofa go? Where is the television? Is there a fireplace? Where are the windows and doors? Does the primary walking path cut through the furniture arrangement?
In the kitchen, find the refrigerator, sink, range, island, pantry and garage entry. Think about the routes between them and the clearances around them. Then do the same thing with bedrooms, bathrooms, offices and other spaces.
Why I Include Furniture on My Plans
I consider furniture planning part of designing the house, not something that should wait until the architecture is finished. A sofa, dining table, bed or favorite piece of furniture can affect where a wall, window or fireplace should go.
Sometimes a house gets designed from the outside in because someone is focused on exterior symmetry, a particular architectural style or an open-plan concept. Those things matter, but you still have to live inside it.
I typically provide the furniture plan on a separate sheet so the primary construction floor plan can remain clean and readable. If your plans do not include furniture, sketch some in yourself at the correct scale. It can reveal problems that are difficult to see when the rooms are empty.
What Does the Scale Mean?
A common residential floor-plan scale is 1/4 inch = 1 foot 0 inches. At that scale, one quarter inch on the correctly printed drawing represents one foot in the actual house. One half inch represents two feet, one inch represents four feet, and two inches represents eight feet.
So an eight-foot sofa would measure two inches long on a true 1/4-inch-scale drawing. You can use an architectural scale, a regular ruler and a little math, or quarter-inch graph paper to experiment with furniture layouts.
Important: physical scale is only reliable when the drawing is printed at its intended sheet size. If someone has selected “fit to page,” reduced or enlarged the sheet, or you are simply viewing the PDF on a screen, measuring it with a ruler will not give you the intended scale. Written dimensions on the drawings are the primary reference.
[IMAGE: Understanding the Scale graphic]
When the Numbers Still Don’t Feel Real, Draw It Full-Size
You can understand that a room is 12 feet by 12 feet and still have absolutely no idea what a 12-by-12-foot room is going to feel like. Even with floor plans, 3D views, renderings and virtual walkthroughs, it can sometimes be difficult to translate dimensions on a screen or piece of paper into real physical space.
When one of my clients is struggling with that, I often tell them: go draw it out full-size.
A driveway and some sidewalk chalk can work beautifully. Measure out the walls and draw the room right onto the concrete. Indoors, painter’s tape or masking tape can work. Then add the sofa, dining table, kitchen island, bed or other major pieces and physically walk around them.
Stand where the doorway would be. Walk around the sofa. Pull out an imaginary dining chair. Walk between the kitchen island and cabinets. Suddenly, 36 inches is not just a number on a dimension string. It is a space you are physically trying to move through.
You Can Do This During Construction, Too
Once construction begins, you may have an even better opportunity to understand your floor plan at full scale. If the foundation or slab is accessible and your builder allows it, use sidewalk chalk to temporarily map out furniture, cabinetry or other elements directly within the space. Draw it, walk it, sweep it off and try something else.
Always coordinate with your builder and stay out of active or unsafe construction areas. A construction site is still a construction site.
[IMAGE: Full-size chalk room and furniture layout]
DESIGN TECH: Walk Through Your Floor Plan at Full Scale
Here is a very cool high-tech version of the sidewalk-chalk exercise. Companies such as Walk Your Plans, Walkable Plans, and PRE/VIEW use large-scale projection systems to project architectural floor plans onto a studio or warehouse floor at a true 1:1 scale.
That means you can physically walk through your future home before it has been built. Stand in the kitchen, walk around the island, follow the path from the garage to the pantry, stand beside the bed and experience the width of a hallway instead of simply reading a dimension.
I have not had the opportunity to take a client through one of these facilities yet, but I would love to. Technology is a big part of how I work with clients. I use sophisticated home-design and 3D modeling software, photorealistic visualization, interactive 3D walkthroughs, VR when appropriate, and emerging tools such as AI to help clients better understand and explore their designs.
None of these tools replaces thoughtful design. They give us more ways to experience the design before we build it.
If you do not have access to a full-scale projection studio, grab a tape measure and some sidewalk chalk. The technology may be different, but the goal is exactly the same: understand the space before you build it.
[IMAGE: Full-scale projected floor-plan technology]
How to Read the Dimensions
Dimensions tell you how large spaces and elements are and where they are located. In many residential plan sets, dimensions reference framing, such as the face of a stud, rather than finished drywall, brick or siding. Other dimensions may reference centerlines, rough openings or another defined point. Always check the notes and dimensioning conventions for the particular set you are reading.
Doors and windows are sometimes located by centerline. One advantage is that a window can change size while its center remains in the intended location. Other drawings may dimension the edges or rough opening instead, so do not assume every set uses the same convention.
Understanding the Sheet Around the Floor Plan
The title block, commonly along the right side or bottom of the sheet, is essentially the drawing’s identification card. It may include the project name or address, designer or firm, sheet title and number, date, scale and revision information.
The Floor Plan Is Only One Part of the Story
A floor plan is one drawing within a larger plan set. Depending on the project and the person preparing the documents, that set might include a project-information sheet, site plan, floor plans, exterior elevations, interior elevations, sections, electrical or reflected ceiling plans, plumbing or other MEP information, roof plans, furniture plans, 3D views and renderings.
Different designers, architects, builders, jurisdictions and projects require different levels of documentation. The important thing is to understand what each sheet is intended to communicate and to compare related sheets when something is not clear.
Don’t Try to Read Everything at Once
Read the plan in passes. Find the front door. Walk the circulation. Look at room relationships. Study individual spaces. Add furniture. Then move into dimensions, doors, windows and the related sheets.
After a while, the heavy lines stop being abstract marks and become walls. The arc becomes a door swinging open. The rectangle in the kitchen becomes an island. And instead of simply looking down at a drawing, you begin imagining yourself moving through the house.
That is when you are no longer just looking at the floor plan. You are beginning to read it.